

CPR Steps Everyone Should Know
Cardiac arrest can happen suddenly and without warning. It may occur at home, in the workplace, at a public facility or during an everyday activity. When someone becomes unresponsive and stops breathing normally, the actions taken by people nearby can make a significant difference.
Cardiopulmonary resuscitation, commonly known as CPR, is an emergency life-saving procedure that helps maintain blood circulation to the brain and other vital organs until professional medical assistance arrives.
Immediate CPR can double or triple a person’s chance of survival following cardiac arrest. Therefore, understanding the basic CPR steps is an important skill that everyone should have.
Important: This article provides general awareness and does not replace practical CPR training conducted by qualified instructors.
What Is CPR?
CPR stands for cardiopulmonary resuscitation. It combines chest compressions and, when appropriate, rescue breaths to help circulate oxygenated blood throughout the body when a person’s heart has stopped beating effectively.
CPR does not normally restart the heart by itself. Instead, it helps maintain blood flow to the brain and vital organs while waiting for emergency medical services and an Automated External Defibrillator, or AED.
The main links in the cardiac arrest chain of survival include:
- Early recognition of cardiac arrest
- Immediate activation of emergency medical services
- Early, high-quality CPR
- Rapid use of an AED
- Advanced medical care and recovery support
Early CPR and rapid defibrillation are particularly important during the first few minutes of cardiac arrest.
How to Recognise Cardiac Arrest
Before beginning CPR, you must first recognise the signs of a possible cardiac arrest.
A person may be experiencing cardiac arrest when they:
- Suddenly collapse
- Do not respond when spoken to or gently tapped
- Are not breathing
- Are only gasping or breathing abnormally
- Show no obvious signs of movement or responsiveness
Occasional gasping should not be mistaken for normal breathing. If the person is unresponsive and not breathing normally, treat the situation as an emergency.
CPR Steps Everyone Should Know
Step 1: Check the Scene for Safety
Before approaching the person, make sure the surrounding area is safe.
Look for possible hazards such as:
- Moving vehicles
- Fire or smoke
- Electrical equipment
- Falling objects
- Chemical spills
- Broken glass
- Unstable structures
Do not place yourself in unnecessary danger. You may not be able to help the casualty if you also become injured.
Use appropriate personal protective equipment, such as disposable gloves or a CPR face shield, when available.
Step 2: Check for Responsiveness
Approach the person and gently tap their shoulders.
Speak loudly and clearly:
“Are you okay?”
Look for any movement, verbal response or reaction. Do not shake the person aggressively.
If the person responds, keep them comfortable and monitor their condition while obtaining medical assistance when necessary.
If there is no response, continue with the following steps immediately.
Step 3: Call for Emergency Assistance
Ask someone nearby to call 999, Malaysia’s emergency response number, and request an ambulance. Ask another person to locate and bring an AED if one is available.
If you are alone and have a mobile phone, call 999 and place the phone on speaker mode. This allows you to begin CPR while receiving instructions from the emergency operator.
Malaysia’s Ministry of Health basic life support guidance emphasises early recognition, calling MERS 999, providing high-quality CPR and using an AED as soon as possible.
When speaking to the emergency operator, provide:
- Your exact location
- The condition of the casualty
- Whether the person is responsive
- Whether the person is breathing normally
- Whether CPR has started
- Whether an AED is available
Do not end the call until instructed by the operator.
Step 4: Check the Person’s Breathing
Place the person on their back on a firm, flat surface.
Check whether they are breathing normally. Look for regular chest movement and listen for normal breathing.
Do not spend too long checking. If the person is unresponsive and not breathing normally, begin CPR immediately.
Members of the public are not expected to perform a prolonged pulse check. Delaying CPR reduces the opportunity to circulate blood to the brain and other organs.
Step 5: Position Your Hands Correctly
Kneel beside the person’s chest.
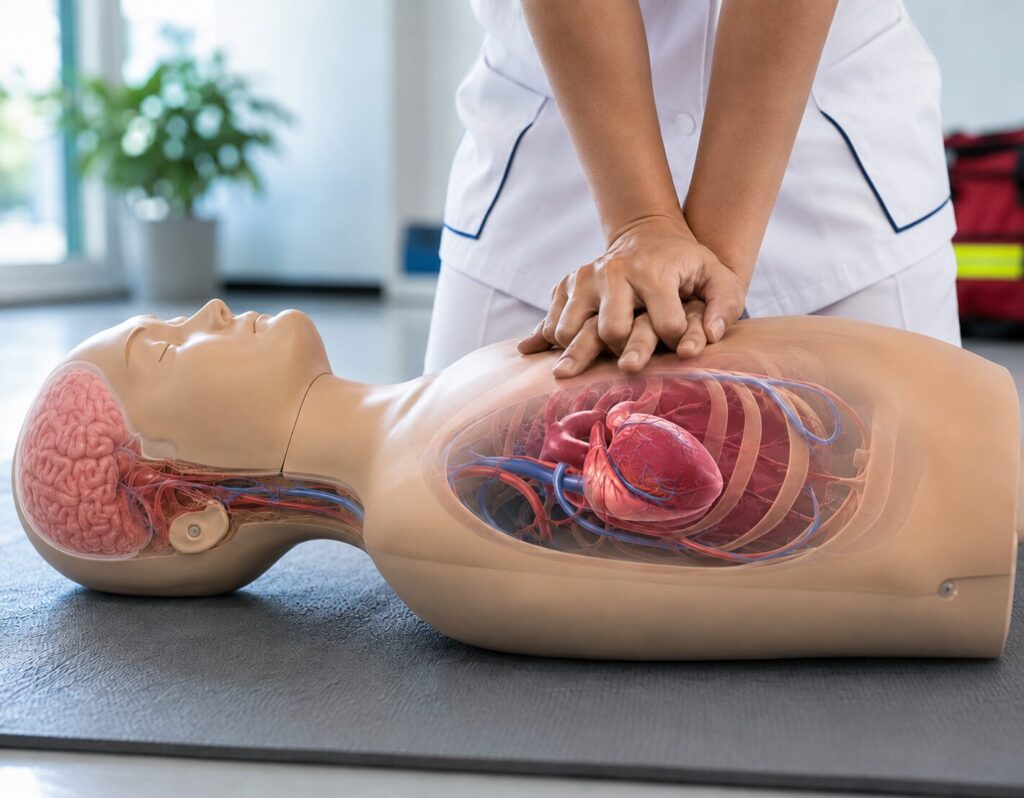
Place the heel of one hand in the centre of the chest, on the lower half of the breastbone. Place your other hand directly on top of the first hand.
Interlock your fingers and keep them away from the ribs.
Position your body correctly:
- Keep your shoulders directly above your hands
- Keep your elbows straight
- Use your upper body weight
- Avoid bending your arms during compressions
Correct hand placement and body position help produce effective chest compressions while reducing unnecessary fatigue.
Step 6: Begin Chest Compressions
Push hard and fast in the centre of the chest.
For an adult casualty:
- Compress the chest at a rate of 100 to 120 compressions per minute
- Push approximately 5 centimetres deep
- Allow the chest to return fully after every compression
- Keep interruptions as short as possible
Use smooth, consistent movements. Avoid leaning on the chest between compressions because the chest must return to its normal position for the heart to refill with blood.
The American Heart Association recommends that all lay rescuers provide chest compressions to adults with presumed cardiac arrest.
Step 7: Give Rescue Breaths When Trained
People who are trained and willing to provide conventional CPR may use a ratio of:
30 chest compressions followed by 2 rescue breaths.
After completing 30 compressions:
- Open the airway using the head-tilt, chin-lift method.
- Pinch the person’s nose closed.
- Create a seal over their mouth.
- Give one breath lasting approximately one second.
- Watch for the chest to rise.
- Give a second breath.
- Return immediately to chest compressions.
Avoid giving breaths that are too forceful or too long.
A CPR face shield or pocket mask should be used when available to reduce direct contact.
Continue performing cycles of 30 compressions and 2 breaths until help arrives or an AED is ready.
What Is Hands-Only CPR?
Hands-Only CPR involves continuous chest compressions without rescue breaths.
It is recommended for an untrained bystander who witnesses an adult or teenager suddenly collapse. The two essential actions are:
- Call the local emergency response number.
- Push hard and fast in the centre of the chest.
Hands-Only CPR allows a bystander to provide immediate assistance even when they are not trained, are unable to give rescue breaths or do not have protective equipment.
However, conventional CPR with compressions and rescue breaths may be especially important in cases involving:
- Children and infants
- Drowning
- Drug overdose
- Breathing emergencies
- Prolonged cardiac arrest
Formal training is strongly recommended because CPR techniques vary according to the casualty’s age and condition.
How to Use an AED
An Automated External Defibrillator is a portable device that analyses the heart’s rhythm and may deliver an electrical shock when required.
AEDs are commonly available at:
- Shopping centres
- Airports
- Office buildings
- Hotels
- Factories
- Educational institutions
- Sports facilities
- Public transport stations
AED Steps
When an AED arrives:
- Turn on the AED.
- Follow its spoken or visual instructions.
- Expose the person’s chest.
- Dry the chest if it is wet.
- Attach the AED pads according to the diagrams.
- Ensure nobody is touching the person while the AED analyses the heart rhythm.
- Deliver a shock if instructed.
- Resume CPR immediately after the shock.
- Continue following the AED instructions.
Do not delay CPR while waiting for an AED. Chest compressions should continue until the AED is ready to analyse the person’s heart rhythm.
When Should You Stop CPR?
Continue CPR until:
- The person begins breathing normally or shows clear signs of life
- Emergency medical personnel take over
- An AED instructs you to pause
- The scene becomes unsafe
- You become physically unable to continue
- A qualified medical professional instructs you to stop
If several trained responders are available, switch the person performing compressions approximately every two minutes to reduce fatigue. Keep the changeover as quick as possible.
Common CPR Mistakes to Avoid
Delaying the Emergency Call
Call 999 as quickly as possible. Emergency medical personnel and an AED are essential parts of the rescue process.
Performing Shallow Compressions
Compressions that are too shallow may not create sufficient blood circulation. Maintain the correct depth while allowing full chest recoil.
Compressing Too Slowly or Too Quickly
Maintain a rate of approximately 100 to 120 compressions per minute.
Bending the Elbows
Keep your arms straight and position your shoulders directly above your hands. Use your body weight rather than relying only on your arms.
Interrupting Compressions Frequently
Every interruption reduces blood circulation. Pause only when necessary for rescue breaths, AED analysis or instructions from medical personnel.
Being Afraid to Take Action
Doing something is generally better than doing nothing when an unresponsive person is not breathing normally.
An untrained person can call 999 and provide Hands-Only CPR by pushing hard and fast in the centre of the chest.
Does CPR for Children and Infants Differ?
Yes. CPR techniques for children and infants differ from adult CPR in several ways, including:
- Hand or finger placement
- Compression depth
- Use of rescue breaths
- Compression-to-breath ratios in certain situations
- AED pad placement
Because children commonly experience cardiac arrest following a breathing emergency, rescue breaths can be especially important.
Parents, teachers, childcare providers, safety personnel and workplace responders should attend practical training that covers adult, child and infant CPR.
Why Practical CPR Training Is Important
Reading about CPR helps create awareness, but practical training provides the confidence and physical skills required during a real emergency.
During hands-on CPR training, participants can practise:
- Recognising cardiac arrest
- Checking responsiveness and breathing
- Activating emergency medical services
- Correct hand placement
- Chest compression rate and depth
- Rescue-breath techniques
- Safe AED operation
- Responding to choking emergencies
- Managing adult, child and infant casualties
Instructor feedback also helps participants identify mistakes and improve their technique using CPR manikins and training AEDs.
Who Should Learn CPR?
CPR training is valuable for everyone, particularly:
- Emergency Response Team members
- Safety and health personnel
- Fire wardens
- Security officers
- Teachers and childcare providers
- Sports coaches and fitness instructors
- Hotel and hospitality employees
- Factory and construction workers
- Office employees
- Parents and caregivers
- Members of the public
Cardiac arrest can happen anywhere. A trained bystander may be the closest person available to provide immediate assistance.
Learn CPR Before an Emergency Happens
The key CPR steps are simple to remember:
Check, call, compress and use an AED.
Check the scene and casualty, call 999, begin high-quality chest compressions and use an AED as soon as it becomes available.
Although these steps may appear straightforward, practical training is the best way to develop confidence, correct technique and readiness. Do not wait until an emergency occurs before learning what to do.
FERA Training Center provides practical Basic Occupational First Aid, CPR and AED Training for organisations, Emergency Response Teams and members of the public.
Participants receive hands-on instruction in casualty assessment, CPR techniques, AED operation and essential first-aid response.
Contact FERA Training Center today to arrange an in-house or public CPR and first-aid training programme.
Phone/WhatsApp: 012-613 0037
Email: [email protected]
Location: Subang Bestari, Shah Alam